文章Matplotlib第 31 章
文本与标注
Matplotlib · 第 31 / 43 章
text() 与 annotate()
两个函数只差一件事:text() 把一段字贴到坐标上,annotate() 多一根指向某点的箭头。所以选型很简单——纯说明文字用 text,要「指着某个数据点说话」用 annotate。
两者共享 transform / bbox / fontdict / ha / va 这整套文字属性,差别只在 annotate 多出 xy、xytext、arrowprops、annotation_clip 这几个。
Axes.text(
    x, y,               # 文字锚点位置,坐标制由 transform 决定(默认 data)
    s,                  # 文字内容;支持 $...$ mathtext 与 \n 换行
    fontdict=None,      # 字体属性字典(等价于直接写 fontsize= 等 kwargs)
    **kwargs            # 其余 Text 属性:ha/va/fontsize/color/rotation/bbox/transform...
)

Axes.annotate(
    text,                       # 文字内容
    xy,                         # ★ 被指向的点(箭头尖端落在这里)
    xytext=None,                # ★ 文字位置;不给就等于 xy(文字压住箭头尖)
    xycoords="data",            # xy 用的坐标系
    textcoords=None,            # xytext 用的坐标系;默认跟随 xycoords
    arrowprops=None,            # ★ 箭头属性字典;不给就没有箭头
    annotation_clip=None,       # 锚点跑到轴外时还画不画
    **kwargs                    # 其余 Text 属性
)| 参数 | 一句话 | 默认值的影响 |
|---|---|---|
transform / xycoords |
坐标系 | 默认 'data',缩放数据时文字跟着动 |
xy / xytext |
箭头端点 / 文字位置 | xytext=None → 文字压在点上 |
ha / va |
文字框哪个角贴锚点 | 'left' / 'baseline' |
rotation / rotation_mode |
旋转角 / 旋转锚定方式 | 0 / 'default'(绕中心) |
bbox |
文字底色框 | None,直接压在图上 |
arrowprops |
箭头 | None,text() 没有这个参数 |
annotation_clip |
轴外是否裁剪 | None → 在 xycoords='data' 时按 True |
transform:文字到底跟着谁动
这是所有「文字跑偏」问题的根源。三种坐标系用一句话区分:data 跟数据、axes 跟子图、figure 跟画布。
import matplotlib.pyplot as plt
import numpy as np

fig, ax = plt.subplots(figsize=(6, 4))
ax.plot(np.arange(10) ** 2)
ax.text(3, 9, '纯数据坐标', fontsize=12)                     # 默认 data:跟着数据缩放
ax.text(.05, .9, 'axes 比例坐标', transform=ax.transAxes)     # 相对子图,0~1
ax.text(.5, -.15, 'figure 图外', transform=fig.transFigure, ha='center')
plt.show()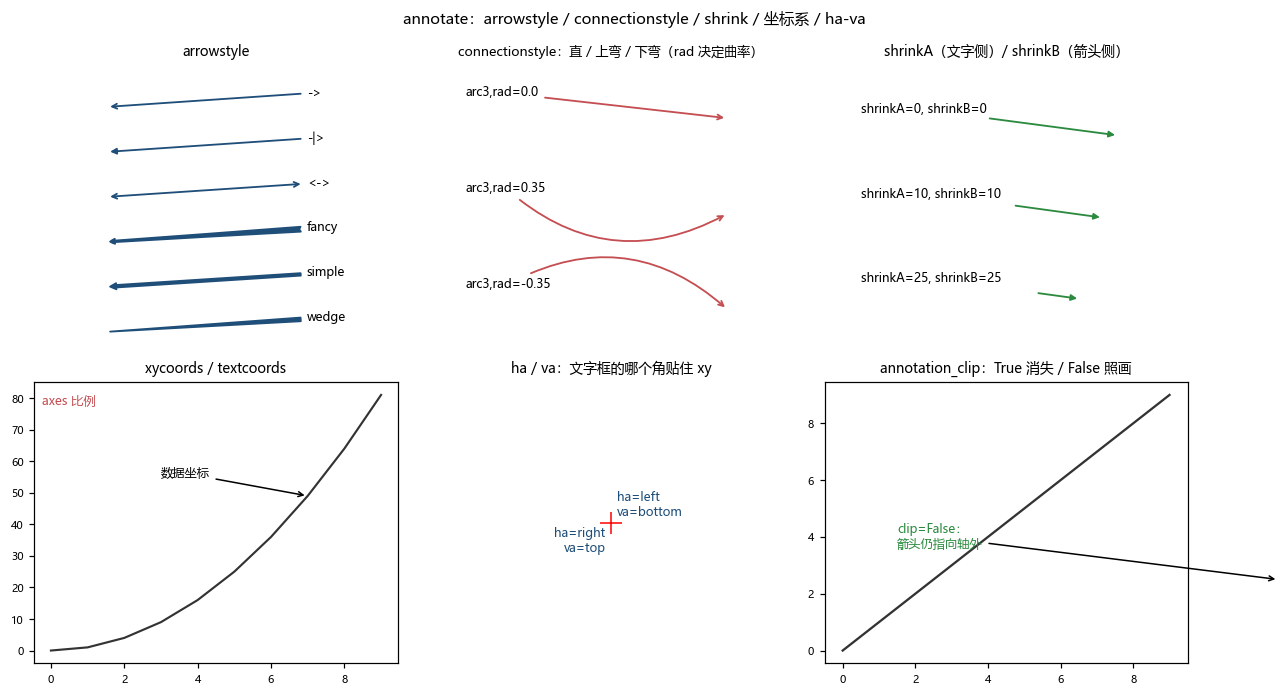
判据:固定位置的说明文字一律用 transAxes。用 data 坐标系标注「左上角」「单位:万元」这类内容,一旦数据范围变了,文字就跑到图外去了。
transAxes 的 (0, 0) 是子图左下角、(1, 1) 是右上角,允许超出 [0, 1](比如 y=-0.15 表示放到 x 轴标签下方)。transFigure 用 fig 的方法而不是 ax 的——写成 ax.transFigure 会 AttributeError。
xy / xytext:两个点,一个被指一个写字
ann = ax.annotate('峰值', xy=(7, 49), xytext=(2, 70),
                  arrowprops=dict(arrowstyle='->'))
print(ann.xy, ann.xyann)
# 输出: (7, 49) (2, 70)xy= 箭头尖端落点(被指向的那个数据点)xytext= 文字所在位置
只给 xy 不给 xytext 时,文字会直接压在被指的点上(xyann 默认等于 xy):
ann = ax.annotate('压在点上', xy=(1, 2))
print(ann.xyann)
# 输出: (1, 2)这时箭头长度为零,arrowprops 等于白给。所以 annotate 至少要给 xytext 才有意义。
xycoords / textcoords:两个点可以各用一套坐标系
ax.annotate('跨坐标系', xy=(7, 49), xycoords='data',      # 箭头指数据点
            xytext=(0.05, 0.95), textcoords='axes fraction',  # 文字钉在左上角
            arrowprops=dict(arrowstyle='->'))
这是 annotate 最实用的一招:箭头指着数据、文字钉在角落。两套坐标系各写各的,文字位置就不会随数据范围漂移。
可取值:'data'、'axes fraction'、'figure fraction'、'axes pixels'、'offset points'(相对锚点偏移多少 pt,配合 xytext=(dx, dy) 微调最方便)。
arrowprops:一个字典装四类东西
arrowprops 的键分四组,混在一起写会很难查:
| 键 | 管什么 | 常用值 |
|---|---|---|
arrowstyle |
箭头形状 | '->' '-|>' '<->' 'fancy' 'simple' 'wedge' |
connectionstyle |
走线方式 | 'arc3,rad=0.3'(弯)、'angle3,angleA=90,angleB=0'(折) |
shrinkA / shrinkB |
两端留缝(pt) | 0~20;A 是文字侧、B 是箭头侧 |
color / lw / alpha |
线条属性 | 同 Line2D |
arrowstyle 的形状差异非常大:
ax.annotate('', xy=(8, 5), xytext=(2, 5), arrowprops=dict(arrowstyle='->'))      # 细线箭头
ax.annotate('', xy=(8, 4), xytext=(2, 4), arrowprops=dict(arrowstyle='-|>'))     # 实心三角
ax.annotate('', xy=(8, 3), xytext=(2, 3), arrowprops=dict(arrowstyle='fancy'))   # 宽箭头块
ax.annotate('', xy=(8, 2), xytext=(2, 2), arrowprops=dict(arrowstyle='simple'))  # 更粗的块
ax.annotate('', xy=(8, 1), xytext=(2, 1), arrowprops=dict(arrowstyle='wedge'))   # 楔形
'->' 和 '-|>' 的区别只在箭头是空心线还是实心块——印刷图用 '-|>' 更清楚。
connectionstyle 决定线怎么走:
arrowprops=dict(arrowstyle='->', connectionstyle='arc3,rad=0')       # 直线
arrowprops=dict(arrowstyle='->', connectionstyle='arc3,rad=0.35')    # 往上弯
arrowprops=dict(arrowstyle='->', connectionstyle='arc3,rad=-0.35')   # 往下弯
rad 的正负决定弯向哪边,绝对值决定曲率。rad=0 时 arc3 退化成直线,所以想要直线可以直接省略 connectionstyle。
shrinkA / shrinkB 是最容易漏的两个键:不设时箭头会贴住文字框的边缘,看起来像从字里长出来的:
arrowprops=dict(arrowstyle='-|>', shrinkA=0, shrinkB=0)     # 两端都贴死
arrowprops=dict(arrowstyle='-|>', shrinkA=10, shrinkB=10)   # 两端各留 10pt
ha / va:文字框的哪个角贴住锚点
ax.text(5, 5, 'ha=left\nva=bottom', ha='left', va='bottom')
ax.text(5, 5, 'ha=right\nva=top',    ha='right', va='top')
同一个 (5, 5),第一种文字往右上长,第二种往左下长。默认 ha='left'、va='baseline'(基线对齐,不是底边)——所以居中对齐要显式写 ha='center', va='center',用 'middle' 也行但 'center' 更常用。
rotation 与 rotation_mode
ax.text(2, 5, '旋转 45°', rotation=45)
ax.text(2, 3, '绕左上角转', rotation=45, rotation_mode='anchor', ha='left', va='top')rotation_mode='default'(默认)绕文字中心转,转完位置会挪;'anchor' 绕锚点转,位置不动。竖排 y 轴标签(rotation=270 + labelpad=16)就是靠这个保持贴边的。
bbox:给文字加底色框
ax.annotate('峰值', xy=(7, 49), xytext=(2, 70),
            bbox=dict(boxstyle='round,pad=0.3', fc='w', ec='red', alpha=.8),
            arrowprops=dict(arrowstyle='->', color='red', lw=1.5))
bbox 只接受字典,键是 boxstyle + Patch 属性(fc / ec / alpha / lw)。pad 是内边距(字号倍数),0.3 是常用值;设 0 会让文字紧贴边框。
boxstyle 共 10 种:circle darrow ellipse larrow rarrow round round4 roundtooth sawtooth square。箭头型的 larrow/rarrow/darrow 还能用 head_width / head_angle 调箭头。
annotation_clip:轴外的标注画不画
ax.annotate('clip=True:整条消失', xy=(12, 7), xytext=(1.5, 8), annotation_clip=True)
ax.annotate('clip=False:箭头仍指向轴外', xy=(12, 2.5), xytext=(1.5, 3.6),
            annotation_clip=False)
默认 None,在 xycoords='data' 时按 True 处理:锚点跑到坐标范围外,整条标注(文字 + 箭头)一起消失。
这是「我明明写了标注,图上却没有」的常见原因——不是没画,是被裁了。要它照画就把 annotation_clip=False 显式写上。
返回对象
ann = ax.annotate('峰值', xy=(7, 49), xytext=(2, 70),
                  arrowprops=dict(arrowstyle='->'))
print(type(ann).__name__)
# 输出: Annotation

print(type(ann.arrow_patch).__name__)
# 输出: FancyArrowPatch

ann2 = ax.annotate('无箭头', xy=(3, 9))
print(ann2.arrow_patch)
# 输出: NoneAnnotation 是 Text 的子类,所以 set_text / set_color / set_fontsize 全都能用;箭头单独存在 ann.arrow_patch 里(一个 FancyArrowPatch),没给 arrowprops 时它是 None——这时对它调 set_color 会 AttributeError。
ann = ax.annotate('峰值', xy=(7, 49), xytext=(2, 70),
                  arrowprops=dict(arrowstyle='->'))
ann.set_text('改过的文字')
ann.arrow_patch.set_color('#C44E52')      # 只改箭头,不动文字
ann.set_bbox(dict(boxstyle='round,pad=0.3', fc='#fff3bf', ec='none'))
plt.show()
text() 返回的就是 Text,没有 arrow_patch 这个属性。
注意事项
- 固定位置的说明文字用
transAxes,用默认的data坐标系会在数据范围变化后跑掉。 fig.transFigure是fig的属性,写ax.transFigure会报错。xytext不给时文字压在点上,箭头长度为 0——annotate至少要给两个点。ha默认'left'、va默认'baseline'(基线),要居中必须显式写。shrinkA/shrinkB不设会让箭头贴住文字框边缘。annotation_clip默认None(等价True),锚点跑出坐标范围时整条标注消失。arrow_patch在没给arrowprops时是None,不能直接调方法。bbox里的pad是字号倍数,不是像素。
综合示例:三种坐标系 / 折线标注 / 外部标注
import numpy as np
import matplotlib.pyplot as plt

plt.rcParams["font.sans-serif"] = ["SimHei", "Microsoft YaHei", "DejaVu Sans"]
plt.rcParams["axes.unicode_minus"] = False

x = np.arange(1, 13)
y = np.array([12, 15, 14, 19, 24, 22, 28, 31, 30, 36, 42, 48])

fig, axes = plt.subplots(1, 3, figsize=(15, 4.6))

for ax in axes:
    ax.plot(x, y, marker="o", ms=4, color="#1f77b4", lw=1.8)
    ax.set_xlabel("月份")
    ax.set_ylabel("销量")

# ---- (a) 三套坐标系各贴一处 ----
axes[0].text(0.03, 0.92, "axes 比例(钉死)", transform=axes[0].transAxes,
             fontsize=9, color="#333333")
axes[0].text(0.03, 0.82, "data 坐标(跟着数据走)", fontsize=9, color="#C44E52")
axes[0].text(0.98, 0.02, "右下角", transform=axes[0].transAxes,
             ha="right", va="bottom", fontsize=9, color="#2b8a3e")
axes[0].set_title("(a) 三种 transform")

# ---- (b) 标注峰值:箭头指数据、文字在空白区 ----
iy = int(np.argmax(y))
axes[1].annotate(f"峰值 {y[iy]}",
                 xy=(x[iy], y[iy]), xycoords="data",
                 xytext=(0.05, 0.85), textcoords="axes fraction",
                 arrowprops=dict(arrowstyle="-|>", color="#C44E52", lw=1.4,
                                 connectionstyle="arc3,rad=0.25",
                                 shrinkA=6, shrinkB=6),
                 fontsize=10, color="#C44E52",
                 bbox=dict(boxstyle="round,pad=0.35", fc="white",
                           ec="#C44E52", alpha=0.9))
axes[1].set_title("(b) 跨坐标系 + 弯箭头 + bbox")

# ---- (c) 框出区间 + 标注在图外 ----
axes[2].axvspan(6.5, 9.5, color="#55A868", alpha=0.12)
axes[2].annotate("旺季", xy=(8, 0), xycoords=("data", "axes fraction"),
                 xytext=(0.62, -0.22), textcoords="axes fraction",
                 ha="center", va="top", fontsize=10, color="#2b8a3e",
                 arrowprops=dict(arrowstyle="->", color="#2b8a3e", lw=1.2),
                 annotation_clip=False)
axes[2].set_title("(c) 标注放到轴外(clip=False)")

plt.tight_layout()
plt.show()(c) 里 xycoords=("data", "axes fraction") 是混合坐标:x 用数据坐标、y 用子图比例。想让标注永远贴着底边又对准某个 x 时,这是唯一干净的写法。
文字框与描边:bbox / path_effects
bbox 给文字贴一张底片(一个 FancyBboxPatch),path_effects 给任意 artist 多描几层。两者都不改数据、只改渲染,而且都吃「字典/列表」而不是关键字:
bbox是字典,键分两拨:boxstyle(形状,参数拼在字符串里)+Patch属性(fc/ec/lw/alpha/mutation_aspect)。path_effects是列表,按顺序绘制,最后一项画在最上面。
Text(x, y, s,
     bbox=dict(
         boxstyle="round,pad=0.3",   # ★ 形状 + 形状参数,全在这一个字符串里
         fc="white", ec="red",       # Patch 属性:底色 / 边色(facecolor / edgecolor 同义)
         lw=1.0,                     # 边宽
         alpha=None,                 # 整体透明度
         mutation_aspect=1,          # 垂直方向形变倍数
         mutation_scale=1,           # 形状整体放大倍数
     ))

Artist.set_path_effects([
    pe.Stroke(linewidth=8, foreground="gold"),   # 第一层:粗金色描边
    pe.Normal(),                                 # ★ 最后一层:原色本体,漏了就没了
])| 键 / 效果类 | 一句话 | 默认值的影响 |
|---|---|---|
boxstyle |
形状 + 形状自己的参数 | 不给 pad 时用 0.3 字号 |
fc / ec / lw |
底片颜色与边宽 | fc 不给 → 透明,文字直接压在图上 |
alpha |
底片整体透明度 | None 跟 fc 的 alpha 走 |
mutation_aspect / mutation_scale |
形状的垂直形变 / 整体放缩 | 1 / 1 |
pe.Normal() |
原色本体 | 漏掉它 → 只剩描边色 |
pe.Stroke |
加粗的纯色轮廓 | 必须配 Normal 才好看 |
pe.withStroke |
一次性写好「描边 + 本体」 | 少写一个 Normal |
pe.SimpleLineShadow / SimplePatchShadow |
偏移阴影 | 默认 offset=(2, -2) |
最小示例
import matplotlib.pyplot as plt
import numpy as np

fig, ax = plt.subplots()
ax.plot([1, 2, 3], [1, 4, 2])

ax.text(2, 4, 'round,pad=0.3', ha='center', va='bottom',
        bbox=dict(boxstyle='round,pad=0.3', fc='#fff3bf', ec='#f08c00'))
ax.text(3, 2, 'square', ha='left', va='center',
        bbox=dict(boxstyle='square,pad=0.4', fc='#e7f5ff', ec='#1971c2'))
plt.show()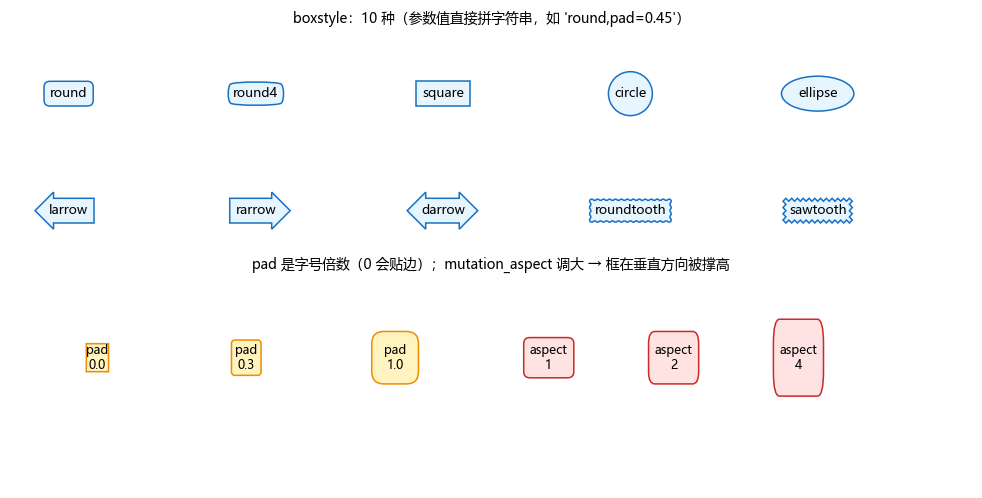
boxstyle:10 种形状,参数拼在字符串里
boxstyle 值 |
形状 | 除 pad 外还能调的参数 |
|---|---|---|
round |
圆角矩形 | rounding_size |
round4 |
圆角更小的矩形 | rounding_size |
square |
直角矩形 | — |
circle |
圆/椭圆(随文字拉伸) | — |
ellipse |
椭圆 | — |
larrow |
左向箭头 | — |
rarrow |
右向箭头 | — |
darrow |
双向箭头 | — |
roundtooth |
波浪上边的方框 | tooth_size |
sawtooth |
锯齿上边的方框 | tooth_size |
import matplotlib.pyplot as plt

fig, ax = plt.subplots()
ax.set_xlim(0, 6); ax.set_ylim(0, 3); ax.axis('off')
for i, st in enumerate(['round', 'larrow', 'roundtooth', 'circle']):
    ax.text(0.7 + i * 1.4, 1.6, st, ha='center', va='center', fontsize=8,
            bbox=dict(boxstyle=f'{st},pad=0.45', fc='#e7f5ff', ec='#1971c2'))
plt.show()除 pad 之外,只有 round/round4 和 roundtooth/sawtooth 有额外参数。用 inspect.signature 逐个查得到的就是这张表:
import inspect
from matplotlib.patches import BoxStyle

for name in sorted(BoxStyle._style_list):
    print(name, inspect.signature(BoxStyle._style_list[name].__init__))
# 输出: circle (self, pad=0.3)
# 输出: darrow (self, pad=0.3)
# 输出: ellipse (self, pad=0.3)
# 输出: larrow (self, pad=0.3)
# 输出: rarrow (self, pad=0.3)
# 输出: round (self, pad=0.3, rounding_size=None)
# 输出: round4 (self, pad=0.3, rounding_size=None)
# 输出: roundtooth (self, pad=0.3, tooth_size=None)
# 输出: sawtooth (self, pad=0.3, tooth_size=None)
# 输出: square (self, pad=0.3)箭头型的 larrow / rarrow / darrow 只有 pad,没有 head_width / head_angle——那是 FancyArrowPatch 的 arrowstyle 参数,别搞混。给 larrow 传 head_width 会直接抛异常。
形状参数必须写在 boxstyle 字符串里,不能提到字典顶层:
ax.text(.5, .5, 'x', bbox=dict(boxstyle='round,pad=0.4,rounding_size=0.6'))  # ✓
ax.text(.5, .5, 'x', bbox=dict(boxstyle='round', rounding_size=0.6))         # ✗
# AttributeError: FancyBboxPatch.set() got an unexpected keyword argument 'rounding_size'
原因:顶层键会被当成 FancyBboxPatch 的 Patch 属性,rounding_size 不是 Patch 属性。
pad / mutation_aspect / mutation_scale
pad 是字号倍数,不是像素。pad=0 会让边框紧贴字的墨迹,看起来像在切字:
ax.text(.5, .8, 'pad=0',   bbox=dict(boxstyle='round,pad=0',  fc='#fff3bf', ec='#f08c00'))
ax.text(.5, .5, 'pad=0.3', bbox=dict(boxstyle='round,pad=.3', fc='#fff3bf', ec='#f08c00'))
ax.text(.5, .2, 'pad=1.0', bbox=dict(boxstyle='round,pad=1',  fc='#fff3bf', ec='#f08c00'))
mutation_aspect 调大后框会在垂直方向被撑高(形状先按 1/aspect 压扁、再整体拉回,结果圆角被放大),常用来让扁长文字配一个不太扁的框。mutation_scale 是整体放大倍数,一般不用动。
fc / ec / lw:底片的三件套
ax.text(.3, .7, '半透明', bbox=dict(boxstyle='round,pad=.3', fc='white', ec='none', alpha=.7))
ax.text(.3, .4, '粗红边', bbox=dict(boxstyle='round,pad=.3', fc='#fff5f5', ec='#c92a2a', lw=2))
ec='none' 不画边;fc='none' 只画边。这两个值写字符串 'none',不是 None。
path_effects:列表顺序就是绘制顺序
核心规则只有一条:列表里每一项画一遍,后面的盖前面的。所以「描边 + 本体」必须把 Normal() 放最后:
import matplotlib.patheffects as pe

line, = ax.plot([0, 1], [0, 1], lw=4)
line.set_path_effects([pe.Stroke(linewidth=9, foreground='gold'), pe.Normal()])
print([type(p).__name__ for p in line.get_path_effects()])
# 输出: ['Stroke', 'Normal']
漏掉 Normal() 的后果是原色整条消失——只剩金色描边,看起来像换了个颜色的线:
import matplotlib.patheffects as pe

line2, = ax.plot([0, 1], [1, 0], lw=4, color='tab:blue')
line2.set_path_effects([pe.Stroke(linewidth=9, foreground='gold')])
print([type(p).__name__ for p in line2.get_path_effects()])
# 输出: ['Stroke'] ← 蓝线被金线盖住对文字做描边用 withStroke,它一次性把两层都排好,不用自己写 Normal:
import matplotlib.patheffects as pe

ax.text(.5, .5, '描边文字', fontsize=24, color='white', ha='center',
        path_effects=[pe.withStroke(linewidth=3.5, foreground='#c92a2a')])
plt.show()
SimpleLineShadow / SimplePatchShadow 是偏移阴影,默认 offset=(2, -2):
import matplotlib.patheffects as pe

line, = ax.plot([0, 1], [0, 1], lw=3, color='tab:blue')
line.set_path_effects([pe.SimpleLineShadow(offset=(3, -3), alpha=.35), pe.Normal()])
print(pe.SimpleLineShadow()._offset)
# 输出: (2, -2)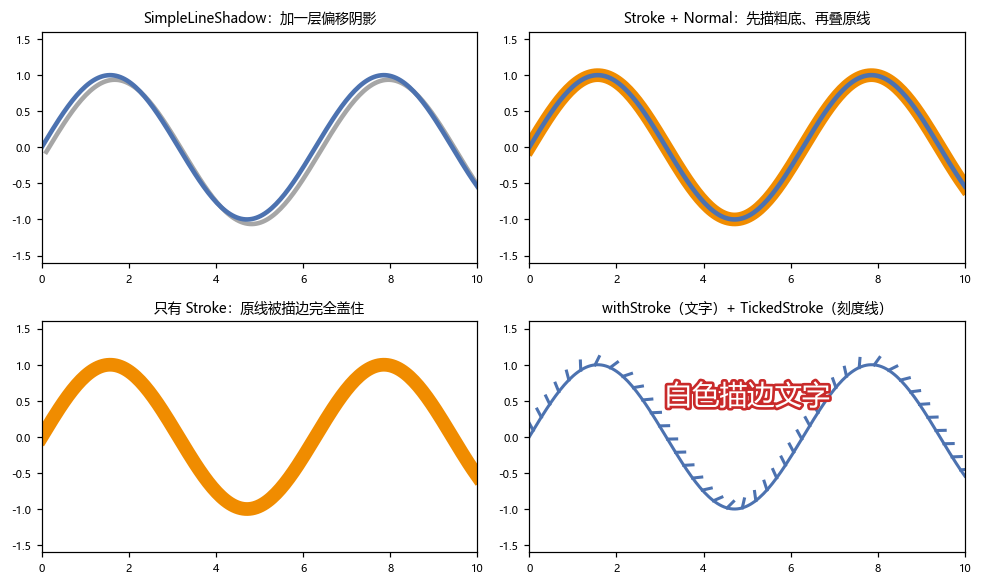
返回对象
import matplotlib.pyplot as plt
from matplotlib.patches import FancyBboxPatch

t = ax.text(.5, .5, 'x', bbox=dict(boxstyle='round,pad=0.3', fc='w', ec='r'))
print(type(t.get_bbox_patch()).__name__)
# 输出: FancyBboxPatch

print(type(t.get_bbox_patch().get_boxstyle()).__name__)
# 输出: Roundbbox 画出来的永远是一个 FancyBboxPatch,而 boxstyle 只是决定这个 patch 怎么变形——所以 get_boxstyle() 拿到的才是 Round / LArrow 这些形状对象,get_bbox_patch() 拿到的始终是同一个类。
拿到 patch 就能事后改样式(text 建好之后再调,不必重建):
t = ax.text(.5, .5, 'x', bbox=dict(boxstyle='round,pad=0.3', fc='w', ec='r'))
p = t.get_bbox_patch()
p.set_facecolor('#fff3bf')
p.set_boxstyle('square', pad=0.6)
print(type(p.get_boxstyle()).__name__)
# 输出: Square
Artist.get_path_effects() 返回原列表(可直接读),set_path_effects([]) 清空回默认。注意 path_effects 挂在 artist 上而不是 figure 上——想全局生效只能写 rcParams 或用 mpl.rc_context 逐 artist 套。
注意事项
bbox只吃字典(或BboxBase),写bbox='round'会AttributeError: 'str' object has no attribute 'copy'。- 形状参数(
rounding_size/tooth_size)必须写进boxstyle字符串,提到字典顶层会报AttributeError。 larrow/rarrow/darrow只有pad,没有head_width/head_angle。pad是字号倍数,pad=0会让边框切到字;常用0.3~0.5。path_effects列表漏掉Normal()→ 原色被描边色整条盖住,不是「变粗了一点」。SimpleLineShadow给线、SimplePatchShadow给面。互换不报错,但阴影的填充方式不同,看起来是另一回事——按对象类型选。path_effects只影响渲染,不影响get_window_extent()之类的几何量——布局按原尺寸算,描边可能超出坐标范围被裁。bbox在annotate里同样可用,和arrowprops互不干扰(一个管字、一个管箭头)。
综合示例:三档底片 / 描边文字压在曲线上 / 多层叠加
import matplotlib.pyplot as plt
import numpy as np
import matplotlib.patheffects as pe

fig, axes = plt.subplots(1, 3, figsize=(13, 3.6))
x = np.linspace(0, 10, 200)

# ① 三种底片风格
ax = axes[0]
ax.plot(x, np.sin(x), color='0.6', lw=1)
ax.text(1.2, .55, '结论 A', bbox=dict(boxstyle='round,pad=0.35', fc='#fff3bf', ec='#f08c00'))
ax.text(3.0, .05, '结论 B', bbox=dict(boxstyle='larrow,pad=0.35', fc='#e7f5ff', ec='#1971c2'))
ax.text(5.4, -.55, '结论 C', bbox=dict(boxstyle='circle,pad=0.45', fc='#f8f0fc', ec='#9c36b5'))
ax.set_title('三种 boxstyle', fontsize=9)

# ② 白字红描边压在密集曲线上
ax = axes[1]
for i in range(6):
    ax.plot(x, np.sin(x + i * .4), color=f'C{i}', lw=1.6)
ax.text(5, 0, '峰值区', fontsize=20, color='white', ha='center', va='center',
        path_effects=[pe.withStroke(linewidth=4, foreground='#c92a2a')])
ax.set_title('withStroke:白字压在杂线里也读得清', fontsize=9)

# ③ 线本身加描边 + 阴影
ax = axes[2]
ax.plot(x, np.cos(x), color='#4C72B0', lw=3,
        path_effects=[pe.SimpleLineShadow(offset=(4, -4), alpha=.3),
                      pe.Stroke(linewidth=8, foreground='#f08c00'),
                      pe.Normal()])
ax.set_title('阴影 + 描边 + 本体(三层)', fontsize=9)

plt.tight_layout()
plt.show()第 ③ 格是三者叠加的写法:三层从上到下依次绘制,所以「阴影」在最底、「描边」在中间、「本体」在最上。顺序反了(比如把 Normal() 写在最前)前两层就全被自己的线盖住,等于没加。